Download Agreement, Release, and Acknowledgement of Risk:
You (the person requesting this file download) fully understand mountain climbing ("Activity") involves risks and dangers of serious bodily injury, including permanent disability, paralysis, and death ("Risks") and you fully accept and assume all such risks and all responsibility for losses, costs, and damages you incur as a result of your participation in this Activity.
You acknowledge that information in the file you have chosen to download may not be accurate and may contain errors. You agree to assume all risks when using this information and agree to release and discharge 14ers.com, 14ers Inc. and the author(s) of such information (collectively, the "Released Parties").
You hereby discharge the Released Parties from all damages, actions, claims and liabilities of any nature, specifically including, but not limited to, damages, actions, claims and liabilities arising from or related to the negligence of the Released Parties. You further agree to indemnify, hold harmless and defend 14ers.com, 14ers Inc. and each of the other Released Parties from and against any loss, damage, liability and expense, including costs and attorney fees, incurred by 14ers.com, 14ers Inc. or any of the other Released Parties as a result of you using information provided on the 14ers.com or 14ers Inc. websites.
You have read this agreement, fully understand its terms and intend it to be a complete and unconditional release of all liability to the greatest extent allowed by law and agree that if any portion of this agreement is held to be invalid the balance, notwithstanding, shall continue in full force and effect.
By clicking "OK" you agree to these terms. If you DO NOT agree, click "Cancel"...
I had a hard time deciding if I was ready for Kelso Ridge. I am sharing my (first) trip report for anyone who might find themselves in the same boat. If that's you, read on!
Where I'm coming from: I'm not a huge fan of exposure, but it's something I am dedicated to working on every year. Even though I've summited nearly half of the 14ers, my class 3 experience has been limited to the Sawtooth ridge, the Citadel (13er), and Longs Peak (Keyhole route). No problems so far. Kelso Ridge seemed like the logical next step in building my confidence and skill set.
Why I was initially apprehensive about this route:
It's a commitment. The farther you go beyond the first class 3 section, turning around and down climbing would not only be extremely unpleasant, but dangerous.
I have zero rock climbing experience.
First knife edge, 'nuff said.
The number of climbing accidents lately has certainly given me pause. I wanted to be sure I wasn't climbing above my ability.
After scouring previous trip reports and assessing the weather, my partner and I decided to go for it. The clear and dry forecast was the final determining factor. We were ready to have some fun.
Trip Report
Saturday, August 26
5:30am - parked just below the 4WD lot (full)
6:00 - left the trailhead
6:45 - arrived at the saddle
9:30 - Torreys summit
11:30 - returned to trailhead
RT time = 5.5 hours
Alpenglow on Grays & Torreys.
After leaving the crowds on the standard route, we took a short break at the saddle and put on our helmets. Heading up the ridge, we agreed to opt for easiest route at each point. Kelso Ridge truly is a 'choose your own adventure' route. Most obstacles can be skirted around to the right of the ridge if you want to keep things at class 2/3. However, once you leave the ridge crest, be warned: you will be trudging up steep and loose gravel and scree.
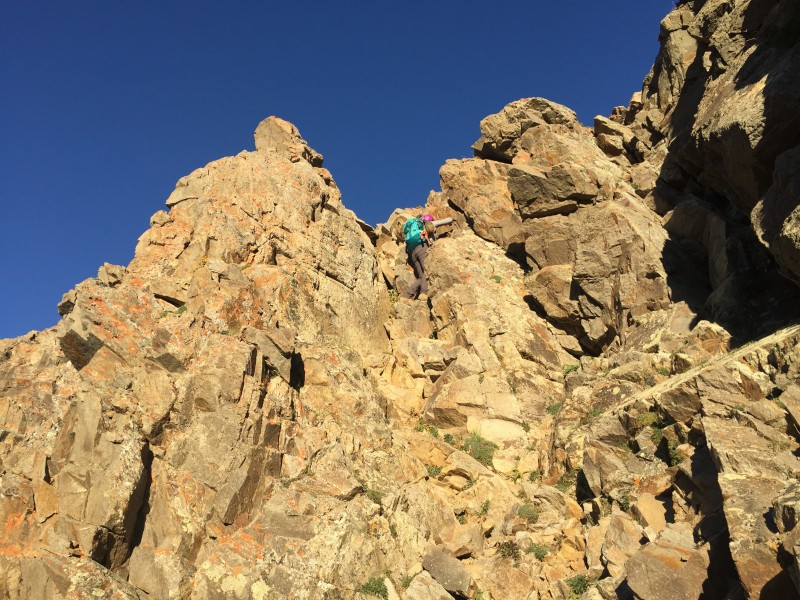
It didn't take long to reach the first class 3 section. We followed the leftmost route seen in photo 10 and found the climbing easy and fun. The exposure is low-to-none and there are plenty of solid handholds, even for a shorter gal like myself. From there, the route becomes progressively more difficult and exposed. If you had to turn around, it seems this would be the time to do so. My amazing, less acrophobic partner leading the way up the first class 3 section.
We continued up the ridge, at times descending a few feet on the right to avoid more serious terrain. Whenever the route became somewhat unclear, we stopped to consult the description and photos. We were looking forward to our next obstacle, the white rock wall. At the base of the wall, we caught up with a group of three climbers. One of them struggled up the crack to the right in photo 14. Again, we chose the leftmost route which was not difficult but did require some interesting full body maneuvers. Minimal exposure and solid rock = more fun scrambling! We hung a right at the top of the wall, feeling great and pumped about the upcoming knife edge.
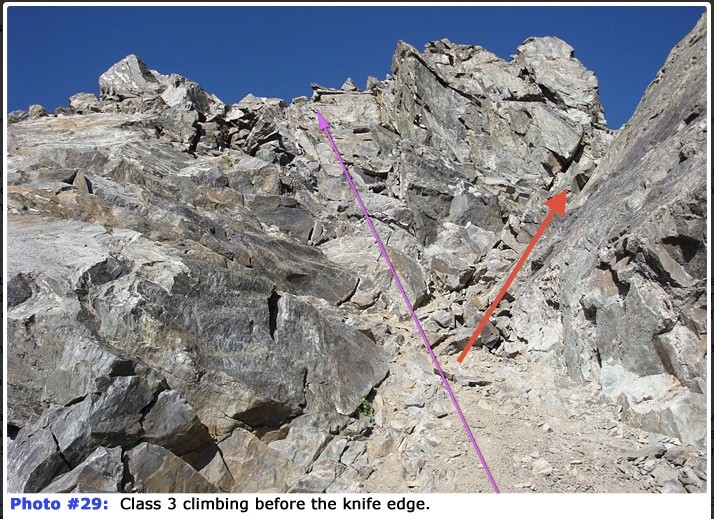
Much to our surprise, the upper route when you drop down on the left side of the ridge (photos 28-31) turned out to be the most difficult section. The area is confusing and steep, with decent exposure behind you. I wouldn't recommend checking out the view here if exposure bothers you. I focused only on following my partner's excellent commands and going up. In hindsight, I think we went slightly off course by going right up to the notch in photo 29, where we misinterpreted 'climb steeply to the right to reach the top of the bump.' Our route definitely stretched my abilities, but did not feel unsafe. Our route in red. Even with the route photos, we missed this.
After a quick break to catch our breath back on top of the ridge, it was time for the main event! The knife edge comes up quickly and before I knew it, I was well on my way to the other side. I'm almost glad to not have photo documentation of this because the horsey-style scooting moves ain't pretty, but they were effective in keeping my weight centered. The exposure is no joke. I kept my mind occupied with hand and foot placement and making sure I was still getting air in my lungs. I had the feeling if I stopped midway for any reason, it would be incredibly difficult to get going again. The edge is wider than it appears in photos, with good foot holds on either side. Hand placement to move forward was easy and very solid. Suddenly I was back in an upright and standing position at the base of the white rock tower with a huge smile on my face. Crossing took less than a minute.
Once around the tower (a short and easy downclimb when dry) the other reports are spot on regarding the loose mess between you and the summit. We witnessed A LOT of rockfall into Dead Dog Couloir caused by the party in front of us. Helmets, helmets, helmets. A few minutes later, we were on the summit and reunited with the masses. We enjoyed a break in the beautiful weather before taking our places in the conga line for the descent on the standard trail (arguably the most difficult part of the entire day, man that thing is packed). The white rock tower, blocking the knife edge from this angle.
Can't fake these smiles. We did it!
Added bonus: admiring your hard work the whole way down.
Final thoughts: What a fun day! Kelso Ridge was a great route for me to step out of my comfort zone.
I believe it was a successful day for me because I had studied the route and saved the photos to reference along the way, went with a strong partner, had some prior class 3 experience, wore a helmet, kept a calm head, and chose a day with a near perfect forecast. The exposure was more than anything I had done previously, but similar to Longs, I found when the exposure was highest, the rock was mostly solid. I also appreciated how our route alternated between steep/rocky class 2 and class 3 sections - the mental breaks were helpful. All in all, the anticipation was far worse than anything I encountered.
Hope this helps! Be safe out there.
Thumbnails for uploaded photos (click to open slideshow):
Yes, Kelso is a super climb for what you wanted, what you expected. It's a non-stop good, fun climbing route!
Exposure is all about focus. Keeping your eye on where you're going and not looking down at 'what could be' and it really isn't too bad at all. Good job! :D
What Doug said - And I think your "final thoughts" at the end shows that you do have your wits about you and will continue to be a safe and successful climber. I look forward to your next report.
It's a Fun route! You guys made good time on it as well!
Caution: The information contained in this report may not be accurate and should not be the only resource used in preparation for your climb. Failure to have the necessary experience, physical conditioning, supplies or equipment can result in injury or death. 14ers.com and the author(s) of this report provide no warranties, either express or implied, that the information provided is accurate or reliable. By using the information provided, you agree to indemnify and hold harmless 14ers.com and the report author(s) with respect to any claims and demands against them, including any attorney fees and expenses. Please read the 14ers.com Safety and Disclaimer pages for more information.
Please respect private property: 14ers.com supports the rights of private landowners to determine how and by whom their land will be used. In Colorado, it is your responsibility to determine if land is private and to obtain the appropriate permission before entering the property.


 Alpenglow on Grays & Torreys.")
 My amazing, less acrophobic partner leading the way up the first class 3 section.")
 Our route in red. Even with the route photos, we missed this.")
 The white rock tower, blocking the knife edge from this angle.")
 Can't fake these smiles. We did it!")
 Added bonus: admiring your hard work the whole way down.")